Subsections of How-Tos
Create a lightweight environment
Once you have a tenancy you can create as many lightweight environments as you like e.g. for
- Testing
- Experimentation
Lightweight environmens rely on the Hierarchical Namespace kubectl plugin.
kubectl hns tree myfirsttenancy
myfirsttenancy
├── [s] myfirsttenancy-dev
├── [s] myfirsttenancy-functional
└── [s] myfirsttenancy-nft
└── [s] myfirsttenancy-integration

[s] indicates subnamespaces
Note: those
myfirsttenancy-[dev|functional|nft|integration]namespaces are lightweight environments. You might not have those in the output if you didn’t create them.
Note: Instruction for installing the
hnsplugin forkubectlcan be found here
Creating additional lightweight environments
You have permission to create as many lightweight environments in your tenancy.
All reference apps create at least:
- functional - for stubbed functional tests
- nft - for stubbed non-functional tests
- integration - for integration tests
Typically, all lightweight environments are created in your dev cluster and only a single namespace per application is in production.
To create a lightweight environment, in your tenancy namespace create:
apiVersion: hnc.x-k8s.io/v1alpha2
kind: SubnamespaceAnchor
metadata:
  namespace: {tenant_name}
  name: your-lightweight-env
Deploying Cloud Infrastructure from the P2P
Authenticating to other GCP projects
Out of the box the Cloud service account that your github actions impersonate only has access to deploy to your namespaces in the platform.
Typically you’ll also have other cloud infrastructure to deploy as part of your path to production.
This infrastructure will be in your own cloud projects, rather than the cloud projects where the platform is running.
Granting access to the P2P service account to deploy infrastructure
- Retrieve the name of your P2P service account in the environment you want to deploy to e.g. for the golang reference app:
TENANT_NAME=golang
kubectl get iamserviceaccount  -n $TENANT_NAME -o=jsonpath='{.status.email}' p2p-$TENANT_NAME
p2p-golang@{{ project-id }}.iam.gserviceaccount.com
This is your `CLOUD_SERVICE_ACCOUNT``
The output should be the service account email starting with p2p-.
Once you have this you can, in your infrastructure project, assign permission to it so when the pipeline next runs it can provision the infrastructure e.g. with terraform. This is only provisioning that we recommend out side of the p2p as it is a chicken and egg problem.
When your make tasks are executed you will already be authenticated with gcloud so you don’t need to do any of that setup.
Annotate Kubernetes Service Accounts
To be able to impersonate the above service account, annotate your service account with the
apiVersion: v1
kind: ServiceAccount
metadata:
  name: NAME
  annotations:
    iam.gke.io/gcp-service-account: CLOUD_SERVICE_ACCOUNT
Your pods should use this service account, then anytime they use a Google Cloud library they will assume the identity of the service account.
P2P
Infrastructure code should implement the steps of the P2P. But who do these work?
p2p-build
The build phase should package the whole infrastructure code in a docker image. That image should be versioned and pushed to the platform provided registry. This image should have everything it needs to successfully deploy the infrastructure, meaning Terraform, Terragrunt, etc..
p2p-function / p2p-nft / p2p-integration
These steps should pull the image that was just pushed in the p2p-build. It then should do a docker run with passing different args.
docker-apply:
  mkdir -p ~/.config
  mkdir -p ~/.config/gcloud
  cat $(CLOUDSDK_AUTH_CREDENTIAL_FILE_OVERRIDE) >> ~/.config/gcloud/application_default_credentials.json

  docker run --rm \
  -e ENV=${ENV} \
  -e ENVIRONMENT=${environment} \
  -e TERRAFORM_ARGS="-auto-approve" \
  -v ~/.config/gcloud/:/root/.config/gcloud \
  -v "${PWD}/Makefile:/app/Makefile" \
  -v "${PWD}/environments/${environment}/config.yaml:/app/environments/${environment}/config.yaml" \
  $(REGISTRY)/${repo_path}/infra:$(VERSION) \
  make infra-apply
Docker Auth
On GithubActions, you’ll be authenticated to the platform, so you can reuse those credential to run using docker.
The above docker-apply task will copy the credentials on the application_default_credentials.json and then mount that as a volume in the docker run, making the commands in the docker use those credentials.
...
cat $(CLOUDSDK_AUTH_CREDENTIAL_FILE_OVERRIDE) >> ~/.config/gcloud/application_default_credentials.json
...
p2p-promote
This setup makes promotion work in a similar way to the application. It will simply promote the versioned docker artifact across different registry paths/registries as deploy to extended-test and prod the latest versions promoted to those environments.
Autoscale application
Warning
Horizontal Pod Autoscaler and Vertical Pod Autoscaler should not be used together to scale the same metric. See using HPA & VPA in conjunction
For more details on how autoscaling works see Autoscaling in depth.
Horizontal Scaling using CPU
Increase pod replicas if cpu of pod exceeds 60%
apiVersion: autoscaling/v2
kind: HorizontalPodAutoscaler
metadata:
  name: reference-app
  labels:
    app.kubernetes.io/name: reference-app
spec:
  scaleTargetRef:
    apiVersion: apps/v1
    kind: Deployment
    name: reference-app
  minReplicas: 1
  maxReplicas: 30
  metrics:
    - type: Resource
      resource:
        name: cpu
        target:
          type: Utilization
          averageUtilization: 60
Horizontal Scaling using Memory
Increase pod replicas if memory usage exceeds 60%
apiVersion: autoscaling/v2
kind: HorizontalPodAutoscaler
metadata:
  name: reference-app
  labels:
    app.kubernetes.io/name: reference-app
spec:
  scaleTargetRef:
    apiVersion: apps/v1
    kind: Deployment
    name: reference-app
  minReplicas: 1
  maxReplicas: 30
  metrics:
    - type: Resource
      resource:
        name: memory
        target:
          type: Utilization
          averageUtilization: 60
Vertical Scaling
Pod cpu/memory requests will automatically be updated based on utilisation. If you do not wish VPA to update pod requests, set updateMode: Off
apiVersion: autoscaling.k8s.io/v1beta2
kind: VerticalPodAutoscaler
metadata:
  name: reference-app
  labels:
    app.kubernetes.io/name: reference-app
spec:
  targetRef:
    apiVersion: apps/v1
    kind: Deployment
    name: reference-app
  updatePolicy:
    updateMode: "Auto"
  resourcePolicy:
    containerPolicies:
      - containerName: '*'
        minAllowed:
          cpu: 100m
          memory: 50Mi
        maxAllowed:
          cpu: 1
          memory: 1Gi
        controlledResources: ["cpu", "memory"]
Connect to CloudSQL
Connectivity & Authentication
With CloudSQL you can configure the connectivity and the authentication via IAM Service Accounts. For connectivity, please follow the setup access cloud infrastructure
Auth
Having a service account configured, we now need to tell the application running to use it. This can be done one of two ways
Google recommends using the the connectors whenever you can, but if it’s not available for the language you’re using, you can use the CloudSQLProxy.
There are a few things you need to have in mind:
- On your database instance enable the flag
cloudsql_iam_authentication(cloudsql.iam_authenticationfor postgres). - Create a
CLOUD_IAM_SERVICE_ACCOUNTuser on your database. This will create your username and on your configuration you’ll set it excluding the@<project_id>.iam.gserviceaccount.com, so in the previous example it would bemyfirsttenancy-caIn case you dont have any other built-in username, you can configure by running something like:NoteService Account users are created without any Database permissions by default, and in order to do that, you need to manually give it the permissions you need.
USER_NAME="test_user"
PROJECT_ID="<PROJECT_ID>"

gcloud config set project $PROJECT_ID
gcloud sql users create $USER_NAME --host=% --instance=mysql-nft --password=test
gcloud sql connect mysql-nft  --user $USER_NAME
# You'll be inside mysql CLI at this point
use reference-db;
GRANT ALL PRIVILEGES ON `reference-db`.* TO `myfirsttenancy-ca`@`%`;
This will:
- Create a user
- Allow the IP you’re connecting from to temporarily access the database
- Grant all privileges on the created database to the SA user on all hosts
After this, feel free to delete the test_user user, or store its details in your preferred SM.
Give permissions to your CLOUD_SERVICE_ACCOUNT
In your automation for your infrastructure cloud account, give whatever permissions are required to your CLOUD_SERVICE_ACCOUNT.
For example, if you want it to access Cloud SQL it will need:
roles/cloudsql.clientroles/cloudsql.instanceUserroles/serviceusage.serviceUsageConsumer
The first 2 are to have cloudsql client permissions and the last one is to be able to use a service that doesn’t not belong to the project.
Billing
To be able to connect, you need to specify to the client which billing account to use, as by default it will try to use the one where the SA is configured, which in this case will be one of the platform environments, but you want it to use your own project. For terraform, you can add these 2 env vars:
export USER_PROJECT_OVERRIDE=true
export GOOGLE_BILLING_PROJECT=$(YOU_PROJECT_ID)
For the application, something similar is required if you’re using IAM SA auth. When creating a connector, you can specify by setting the quota project. In go, that will look like this:
...
 d, err := cloudsqlconn.NewDialer(context.Background(), cloudsqlconn.WithIAMAuthN(), cloudsqlconn.WithQuotaProject(getBillingProject()))
...
Alternatively you can use the cloudsql proxy and pass this as an argument --quota-project project.
Connect to MemoryStore
Connectivity
Creating and accessing a Database like Redis with PSA is simpler that cloudsql.
After you configure your tenancy network,
you’ll be able to create your redis instance.
There, you’ll chose PRIVATE_SERVICE_ACCESS
as the connection mode and configure the Core Platform’s network as the authorized network
which is constructed like
projects/${platform_project_id}/global/networks/${platform_environment}-network"Once configured and deployed, the redis instance will be given a private IP from the PSA range and you’ll be able to reach it without any more configurations from your pods.
Auth
Being part of the same network, this will not be using IAM SA Auth, nor is it support. Auth is disabled by default and can be enabled. Read more about Redis Auth here
Disadvantages
Being on the same network as the platform, means that any pod inside that network will have connectivity to redis, whether it’s the same tenant or not. The way to prevent this will be to have Network Policies with default deny to the PSA range and only enabling it for a specific tenant.
Create GCP Project for Tenant Infrastructure
Description
The goal of this How-To is to understand how and why you as a tenant can create a project under the tenant-infra folder for each environment.
If take a look at the projects in the GCP console, you’ll see that each environment has a tenant-infra folder:

On that folder, each tenant can create different GCP projects where they can create the custom infrastructure. This one you can segregate the ownership and costs of that infrastructure to a specific tenant.
How?
First, you’re going to need some information as pre-requisites:
- Knowing the parent project (projectId in environments config.yaml) -
PROJECT_ID - Knowing the folder ID of the tenant-infra folder -
FOLDER_ID - Know the billing account ID. This can be an existing one, or you can create a new one via the UI -
BILLING_ACCOUNT_ID - Have a unique name for the new project. If it’s not unique the creating command with fail and you can try another name. -
NEW_PROJECT_ID
Creating the project
With the above data, using gcloud is the easiest way to create a new project.
Warning
If you don’t have permissions to run this, you might need to reach out to your Platform Operator or Cloud Administrator.
You can do these by running the commands:
gcloud projects create ${NEW_PROJECT_ID} --billing-project ${PROJECT_ID} --folder ${FOLDER_ID}Don’t let the parameter name --billing-project confuse you into thinking this will be the billing-account id, that’s for the next step.
Associating Billing Account
You now can link the billing account to it:
gcloud billing projects link ${NEW_PROJECT_ID} --billing-account=${BILLING_ACCOUNT_ID}And that’s it! The project is now ready to have infrastructure
Next steps
For next steps, you can follow up with:
Setting resource requests
Warning
Setting a low memory limit can lead to Out Of Memory kills of your application.
Note
Setting resource requests can prevent Out of Memory (OOM) and CPU throttling for your workloads. It’s usually best to not set CPU limits. See memory vs cpu for more details.
Memory Requests & Limits
apiVersion: apps/v1
kind: Deployment
metadata:
  name: reference-app
  labels:
    app.kubernetes.io/name: reference-app
spec:
  template:
    spec:
      containers:
      - name: reference-app
        resources:
            requests:
                memory: "512Mi"
            limits:
                memory: "1Gi"
CPU Requests & Limits
apiVersion: apps/v1
kind: Deployment
metadata:
  name: reference-app
  labels:
    app.kubernetes.io/name: reference-app
spec:
  template:
    spec:
      containers:
      - name: reference-app
        resources:
            requests:
                cpu: "200m"
            limits:
                cpu: "500m"
Create Ingress with Basic Authentication
Warning
This uses beta features in the platform and breaking changes may occur in the future
What you need to know
To create ingress with out of the box basic authentication, you need to use the Traefik CRD Middleware.
How does it work?
First we need to create a secret with a list of users we want to use:
apiVersion: v1
kind: Secret
metadata:
  name: authsecret
  namespace: <namespace>
data:
  users: |2
    dGVzdDI6JGFwcjEkZVFFU0hOZEEkdi5ETFFJU1lOb0ZDVERuSlJiRmdQLwoK
    dGVzdDokYXByMSRMOGhDb0gySiR3emZUYkpDUEtndjlhZm0xdUtuRG8uCgo=
This contains 2 users, one on each line. The password here is expected to be encrypted and then the whole string encoded to base64. You can use the command htpasswd -nb <user> <password> | openssl base64 to generate each user.
Then you need to create a middleware.traefik.io object. If on your resource you come across a middleware.traefik.containo.us, that is an older version of Treaefik’s CRD. It will still work but it will be deprecated in the future.
The Middleware will look like this:
apiVersion: traefik.io/v1alpha1
kind: Middleware
metadata:
  name: <middlewareName>
  namespace: <middlewareNamespace>
spec:
  basicAuth:
    secret: authsecret
After this, we can reference it in our Ingress object with the annotation traefik.ingress.kubernetes.io/router.middlewares: <middlewareNamespace>-<middlewareName>@kubernetescrd, for example:
apiVersion: networking.k8s.io/v1
kind: Ingress
metadata:
  labels:
  annotations:
    external-dns.alpha.kubernetes.io/hostname: connected-app-functional-test.gcp-dev.cecg.platform.cecg.io
    external-dns.alpha.kubernetes.io/target: gcp-dev.cecg.platform.cecg.io
    traefik.ingress.kubernetes.io/router.middlewares: golang-auth-middleware@kubernetescrd
  name: connected-app-test
  namespace: connected-app-functional
spec:
  ingressClassName: platform-ingress
  rules:
  - host: connected-app-functional-test.gcp-dev.cecg.platform.cecg.io
    http:
      paths:
      - backend:
          service:
            name: connected-app-service
            port:
              number: 80
        path: /
        pathType: ImplementationSpecific
After you apply this, only the request authenticated with those users will be able to use that ingress URL.
Debugging
To validate that your Middleware has been applied successfully, check the Traefik Dashboard and ensure that it contains no errors.
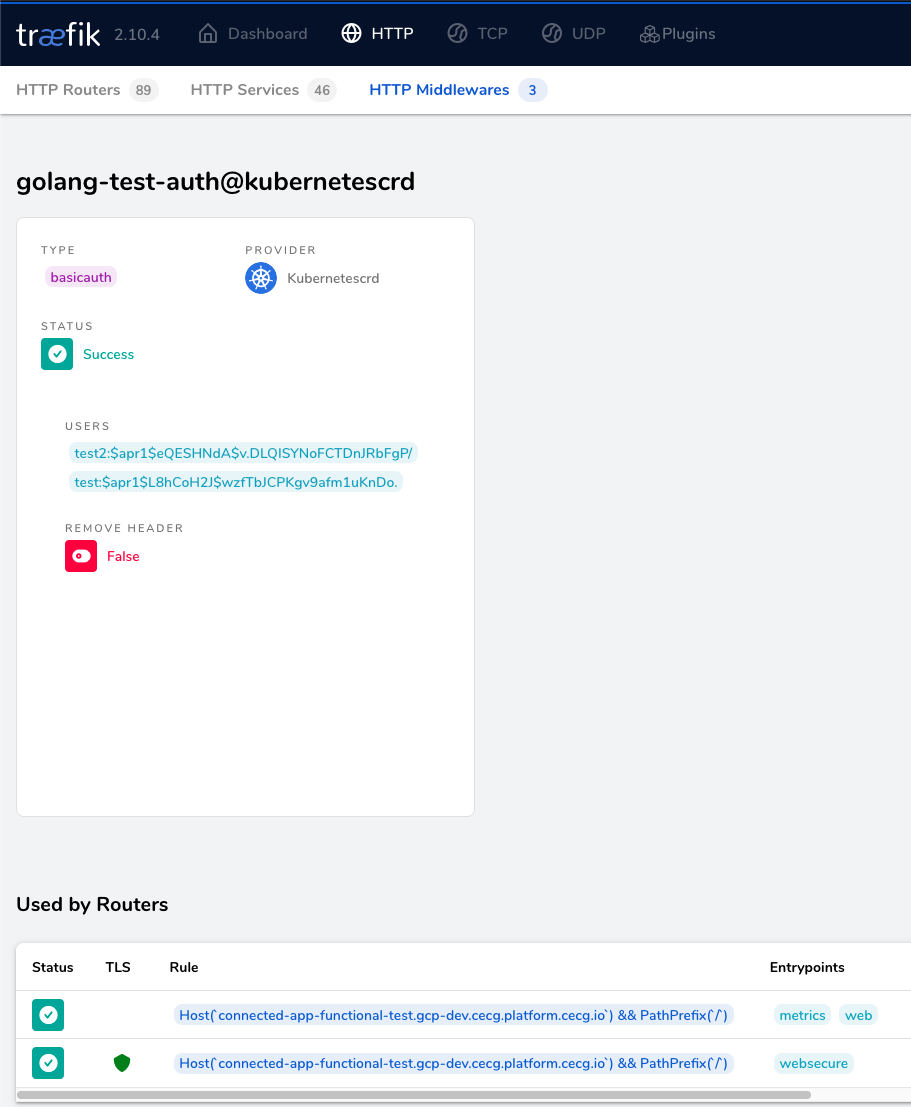
Traefik Dashboard
Create Ingress with IP Whitelisting
Warning
This uses beta features in the platform and breaking changes may occur in the future
Create middleware
Note
If on your resource you come across a middleware.traefik.containo.us, that is an older version of Treaefik’s CRD. It will be deprecated in the future.
Create a middleware.traefik.io object to whitelist IP addresses:
apiVersion: traefik.io/v1alpha1
kind: Middleware
metadata:
  name: <middlewareName>
  namespace: <middlewareNamespace>
spec:
  ipWhiteList:
    ipStrategy:
      depth: 2 # depth is required as request is forwarded from load balancer. See https://doc.traefik.io/traefik/middlewares/http/ipwhitelist/#ipstrategydepth for more details
    sourceRange:
    - <ip-address>
    - <ip-address>
Use Middleware in Ingress
Reference middleware in our Ingress object with the annotation traefik.ingress.kubernetes.io/router.middlewares: <middlewareNamespace>-<middlewareName>@kubernetescrd, for example:
apiVersion: networking.k8s.io/v1
kind: Ingress
metadata:
  labels:
  annotations:
    external-dns.alpha.kubernetes.io/hostname: foo.gcp-dev.cecg.platform.cecg.io # change this to point to your hostname
    external-dns.alpha.kubernetes.io/target: gcp-dev.cecg.platform.cecg.io # change this to point to your domain
    traefik.ingress.kubernetes.io/router.middlewares: <middlewareNamespace>-<middlewareName>@kubernetescrd
  name: foo-app
  namespace: foo
spec:
  ingressClassName: platform-ingress
  rules:
  - host: foo.gcp-dev.cecg.platform.cecg.io
    http:
      paths:
      - backend:
          service:
            name: foo-service
            port:
              number: 80
        path: /
        pathType: ImplementationSpecific
After you apply this, only users with whitelisted IPs will be able to use that ingress URL.
Debugging
Dashboard
To validate that your Middleware has been applied successfully, check the Traefik Dashboard and ensure that it contains no errors.
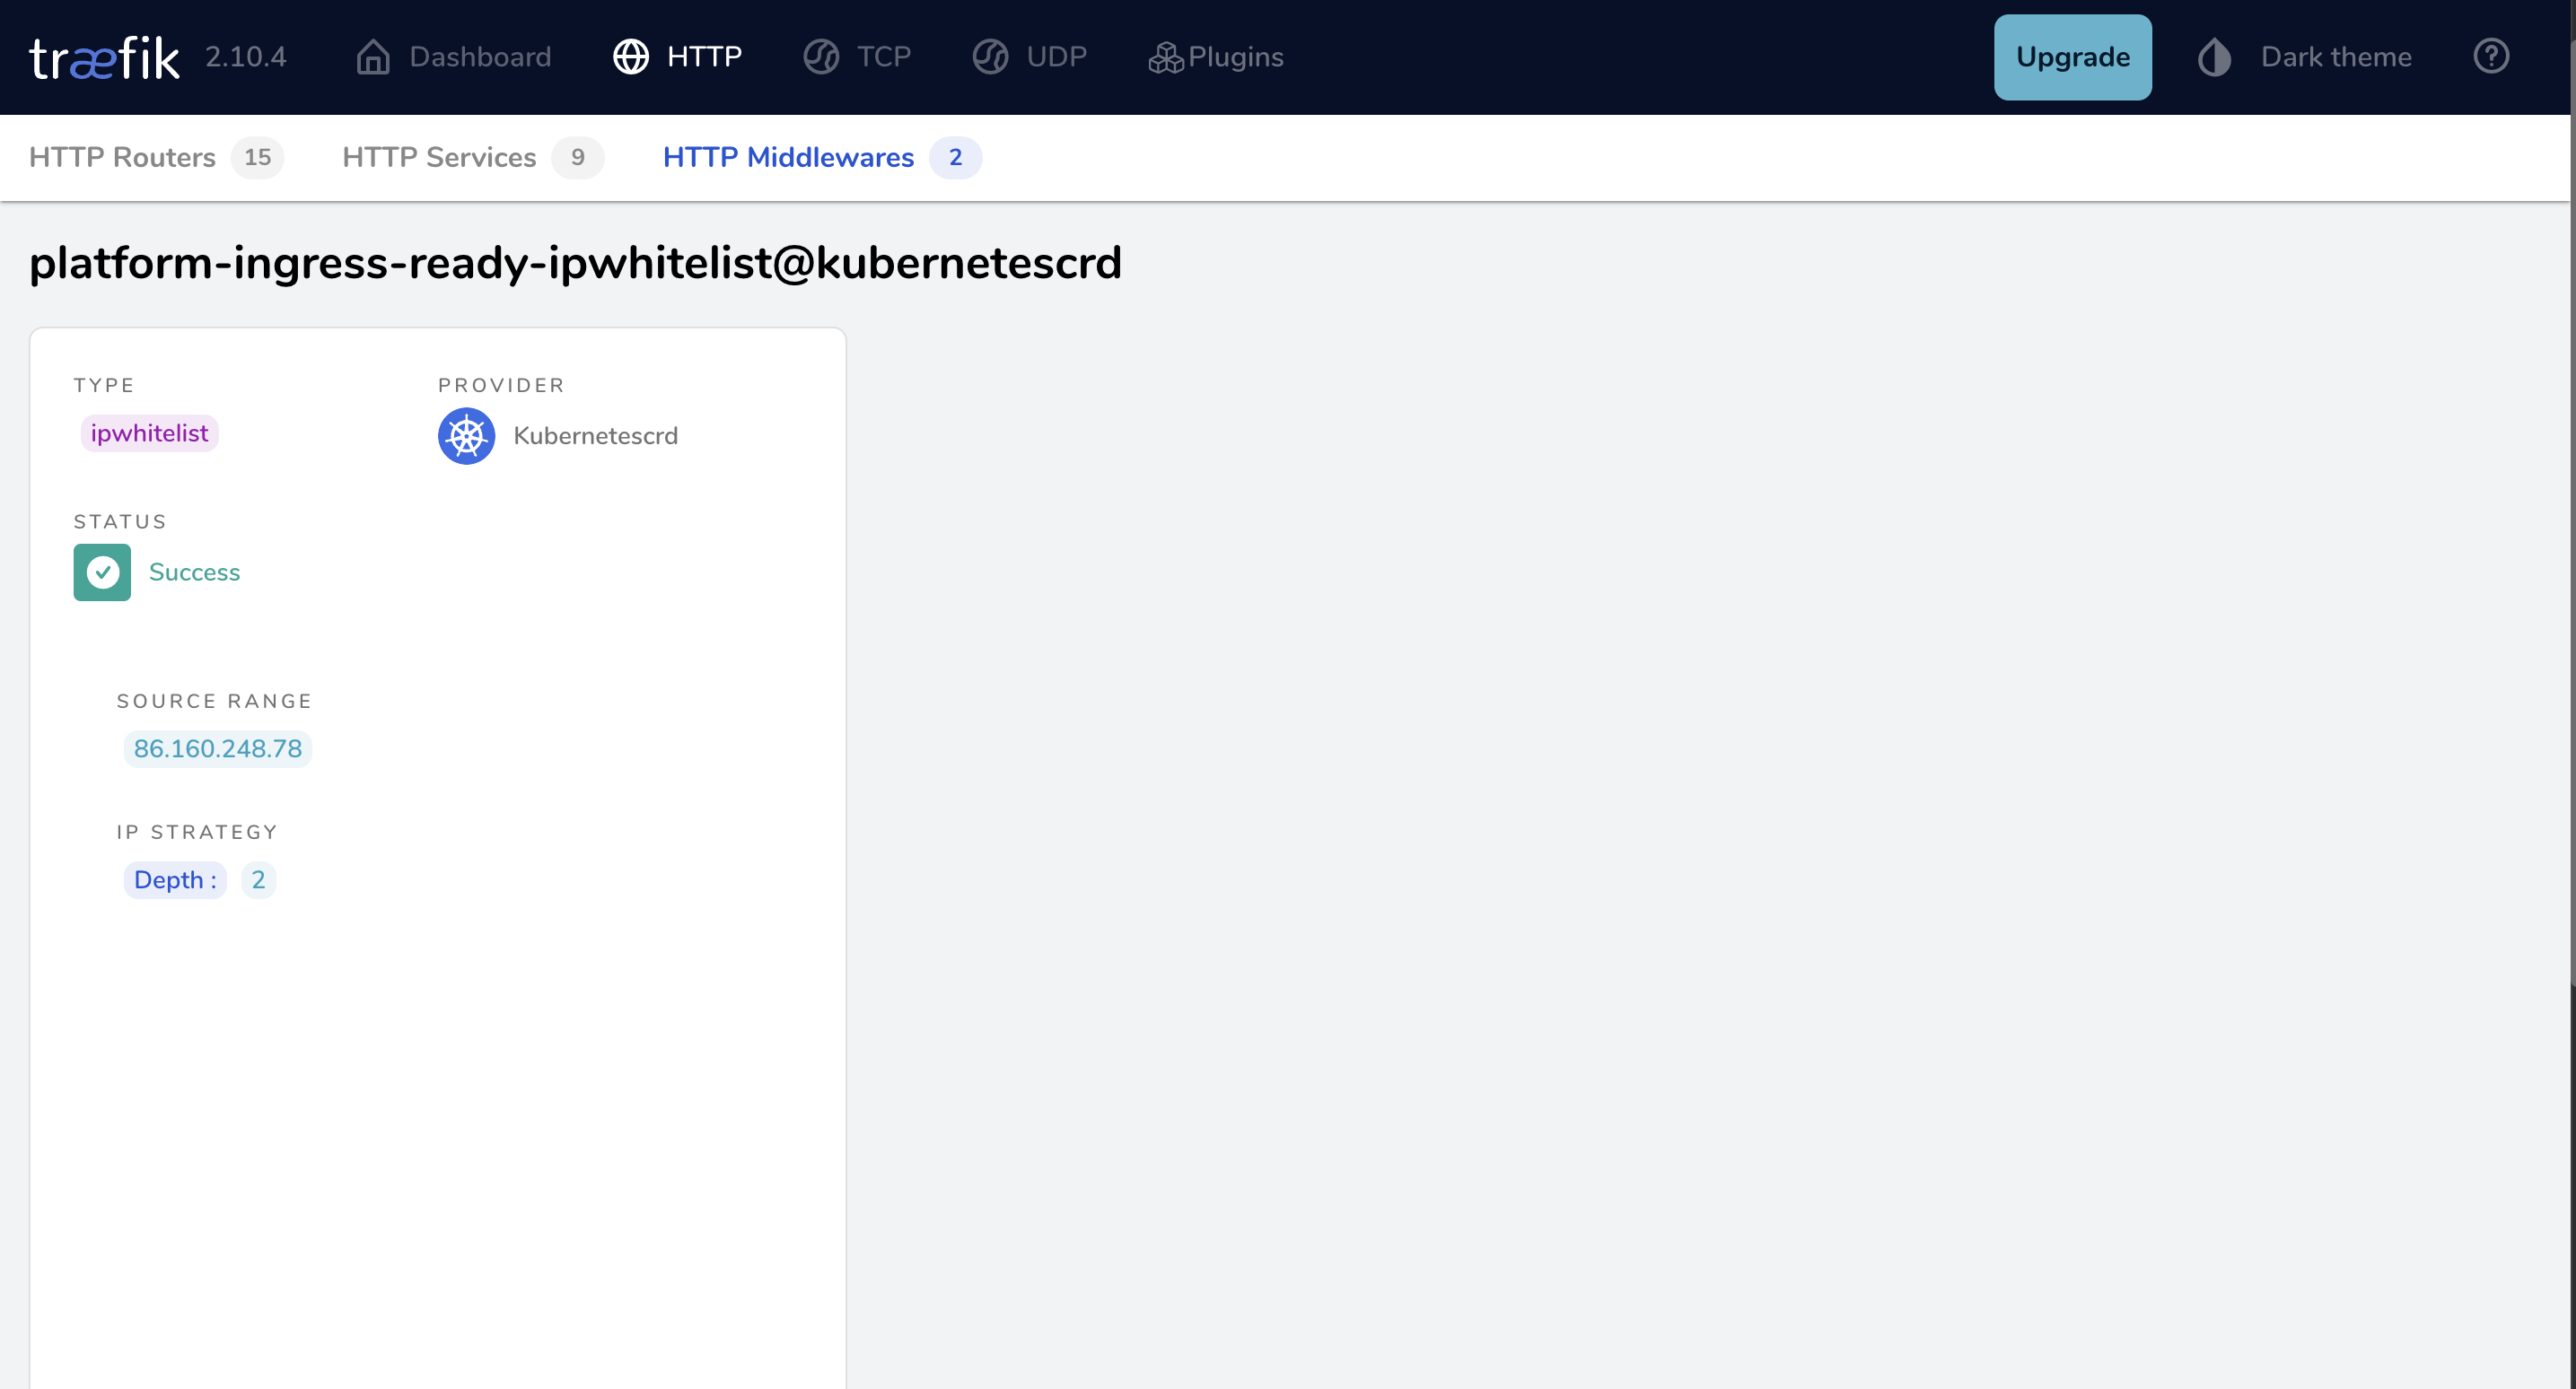
Traefik Dashboard
Logs
Check traefik logs to see whether request is being whitelisted:

Traefik Logs
Login Docker Hub
Login to Docker Hub
Why do I need this?
Docker Hub has pull rate limits. If you’re not logged in, you will have a shared quota for those pulls which you will not control.
To avoid this you should be using either a team account or organization account to login as part of the p2p-build step in the Makefile.
By having your own account, you’ll ensure only that you have your own quota that is not shared by anyone so you’ll have more predictable limitations
How to login
After you create an account, you’ll need to have to create a Personal Access Token. You can follow that link or go to Account Settings->Personal access token.

You can then generate a new one with Public Repo Read-only Access permissions.
Configuring p2p
In order to use the the token, we’ll create a new secret in GitHub and call it DOCKERHUB_PAT. You can also store the username there with DOCKERHUB_USER.
Then we’ll modify our fast-feedback.yaml workflow to include that secret as an environment variable. Don’t worry, this will still be encoded and treated as a secret
fastfeedback:
  needs: [version]
  uses: coreeng/p2p/.github/workflows/p2p-workflow-fastfeedback.yaml@v1
  secrets:
    env_vars: |
        DOCKERHUB_USER=${{ secrets.DOCKERHUB_USER }}
        DOCKERHUB_PAT=${{ secrets.DOCKERHUB_PAT }}
Now we need to jump over to the Makefile and locate our p2p-build task.
We’ll create a new task docker-login and add it as a dependency to the p2p-build
.PHONY: p2p-build
p2p-build: docker-login build-docker ## Builds the service image and pushes it to the registry

.PHONY: docker-login
docker-login: # Login to docker
  echo $(DOCKERHUB_PAT) | docker login -u $(DOCKERHUB_USER) --password-stdin
Debug Cloud Access issues
Validate configuration
To get you started, ensure you’ve followed the access cloud infrastructure documentation. Having done that we can start debugging.
Check tenant configuration
Go to the platform-environments repo and ensure your tenant has cloud access properly configured.
cloudAccess:
  - name: ca
    provider: gcp
    environment: all
    kubernetesServiceAccounts:
- <your_namespace>/<sa-name>- Have your changes been merged?
- Has the pipeline finished?
Looking at kubernetesServiceAccounts:
- Is the namespace you’re trying to connect from listed there?
- Does the Service Account name match? The Kubernetes Service Account being used by your deployment/pod needs to match exactly what is defined there?
Tenant Provisioner status
In case all above looks correct, there might be exceptional issues with the tenant provisioner. In this case, you should reach out to a platform operator and ask them to check the status of the tenant provisioning of your tenant. This functionality will be added to corectl in a future release.
Validate permissions
Failure on CI
If the issue is on CI creating the resources/connecting to your account, it might be an issue with the configured service account. Out of the box, the SA using on GH actions will work to deploy to your tenant’s namespace in the Kubernetes Cluster, to use the same SA to deploy your infrastructure in a different GCP account, you need to ensure that SA has permission to do so.
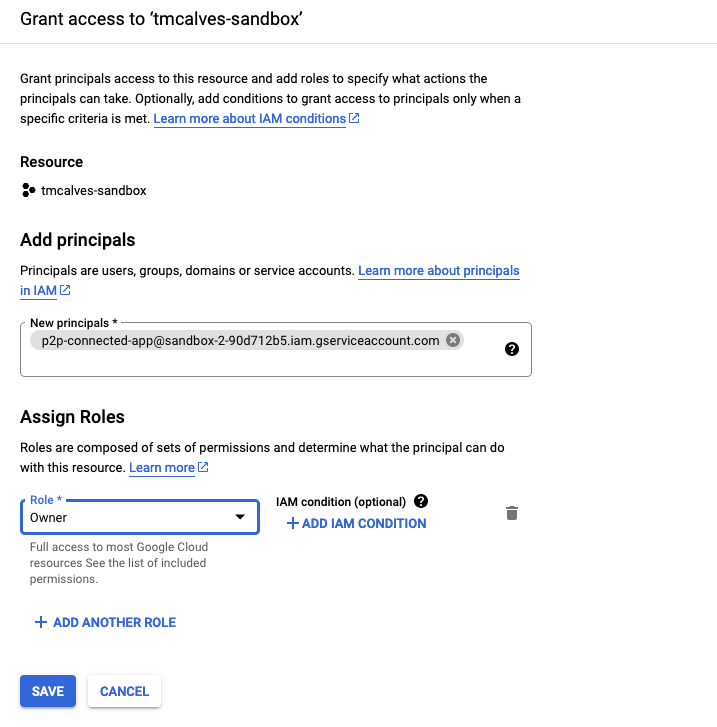
Validate that the p2p service account has enough permission on your own GCP project
The p2p service account needs permission to deploy the infrastructure.
The principal will be p2p-<tenantName>@<platformProjectId>.iam.gserviceaccount.com.
The role of Owner will allow it to create anything it needs, feel free to make this more restrictive.
Namespace Dashboard
Deploy gcloud-debug pod
Failure on the application
In order to determine whether the problem lies in the application code or is an issue with GCP permissions, you can
deploy a gcloud-debug pod to your tenant namespace. This pod can use the same service account as your application,
allowing you to perform operations directly using the gcloud CLI.
Create gcloud-debug pod
Example Kubernetes manifest file for gcloud-debug pod
gcloud-debug-pod.yaml
apiVersion: v1
kind: Pod
metadata:
  name: gcloud-debug
  labels:
    app: gcloud-debug
spec:
  serviceAccountName: <service_account_name>
  containers:
    - name: gcloud-debug
      image: google/cloud-sdk:latest
      imagePullPolicy: IfNotPresent
      command: ["/bin/sh"]
      args: ["-c", "sleep 3600"]
This can help you understand if the issue is on your own GCP Account that hasn’t given enough permissions to the service account.
This pod can be deployed to your namespace with:
kubectl apply -f gcloud-debug-pod.yaml --namespace ${NAMESPACE}Use gcloud-debug pod for debugging
Once the pod has been deployed, you can open a shell into it:
kubectl exec -it gcloud-debug --namespace ${NAMESPACE} -- /bin/shYou can now use the gcloud CLI as your service account. To verify that the service account is being used, check the
output of gcloud auth list.
Cleanup
After debugging, remember to delete the gcloud-debug pod to clean up your namespace:
kubectl delete pod gcloud-debug --namespace ${NAMESPACE}If none of these work, reach out to a platform operator to drill down for any exceptional causes.